RSS

My real job

My real job,and by that I mean the one that pays the bills, is that of being the technician in the Fluids Lab in the Dept of Mechanical Engineering at Melbourne University. For those of you who think that sounds a little dodgy, Fluids are defined as a substance,liquid or gas that is capable of flowing and that changes its shape at a steady rate when acted upon it by a force tending to change its shape. For the layman this means that we commonly study the flow of air or water and how it reacts to certain interruptions. We do this in wind tunnels or water channels and we are particularly interested in turbulence. I get to make lots of exiting bits and pieces, many of them highly accurate, to aid in this process.
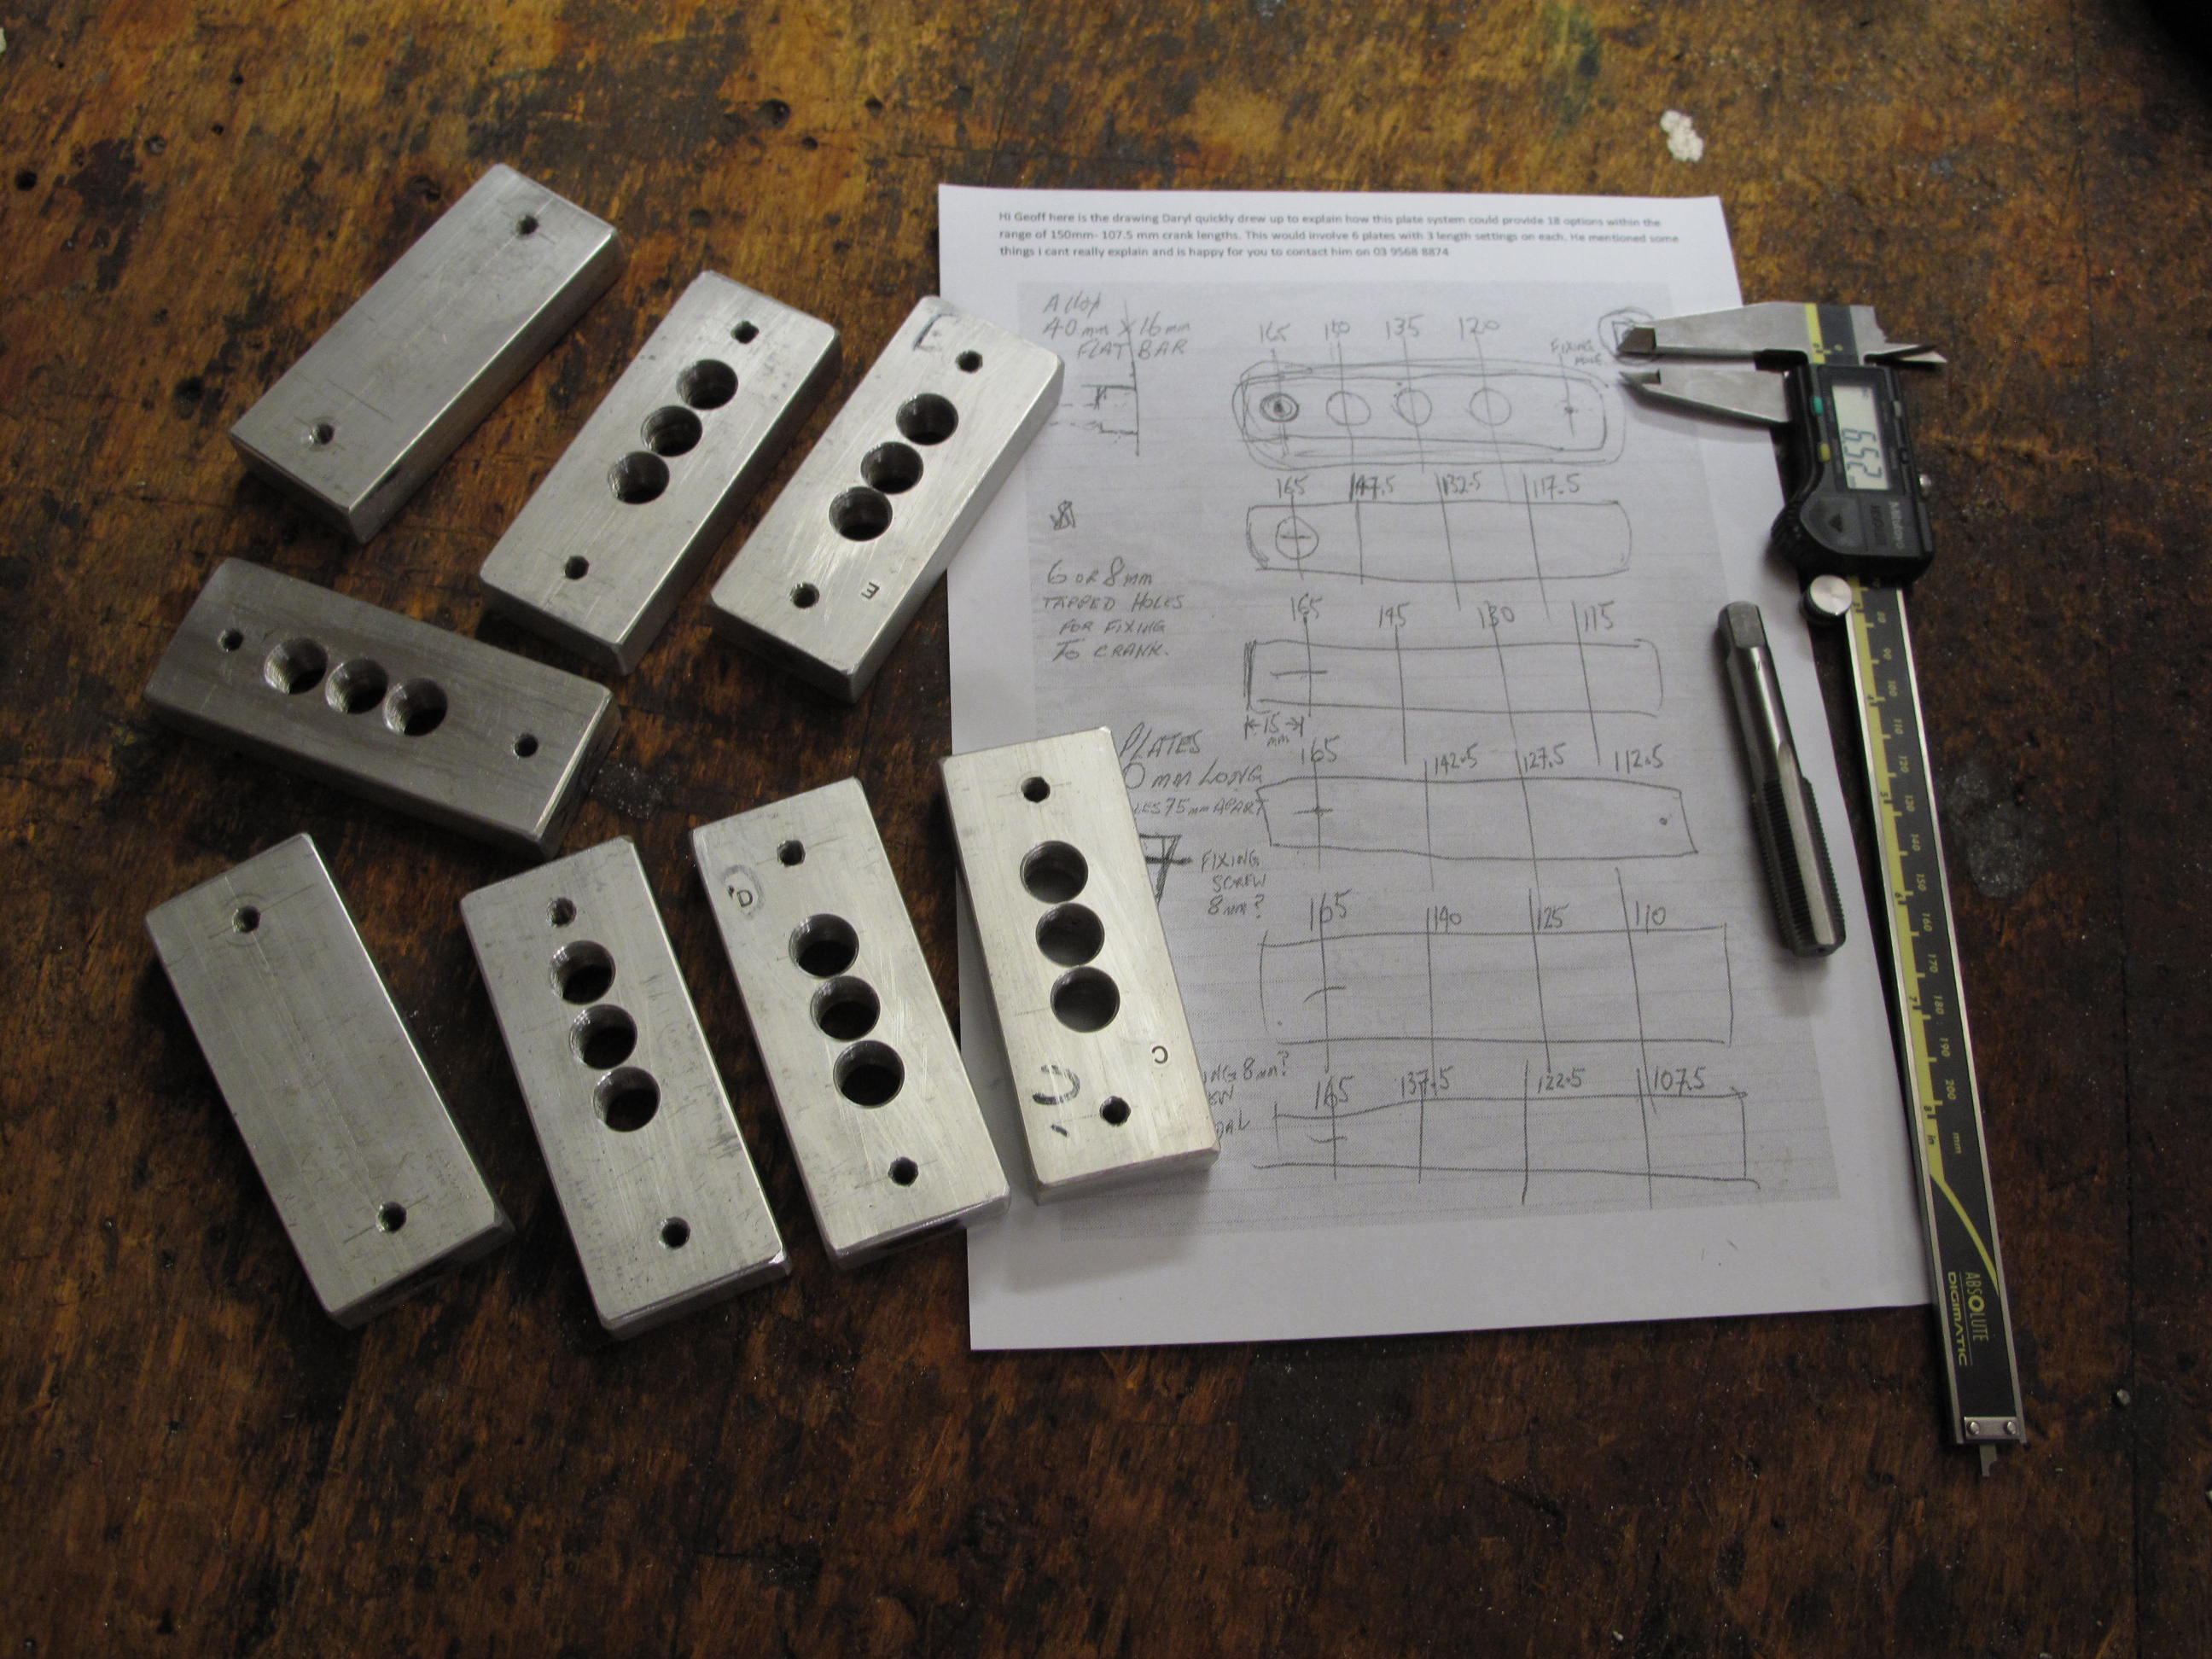
One of our current projects involves the measurement of flow and turbulence behind a cyclists legs at various degrees of cadence and ultimately whether different cadence might produce the same amount of power with less turbulence ie. be more aerodynamic and therefore enable faster speeds. In order to do this we have a grant from the AIS in Canberra and I have been engaged in building a working model of a cyclists legs that can run for several hours at the same cadence in the wind tunnel while we take measurements. We have tried to replicate the action of a specific elite cyclist (identity unknown). We have the same leg lengths, saddle height, and setback and have tried to repeat the amount of ankling that their tracking shows. This is far more difficult than it first seemed. Our bodies are much more flexible than lengths of aluminum and bearing joints that bond them together and getting our model right is not proving to be that easy. We are getting there but this what has taken up most of my time recently.I must admit it looks a little creepy and will sound better once we eliminate a few pin joints and substitute bearings and look better when we get the flesh molded on to the legs . Hopefully more footage will follow.It has. See below

IMG 0024 from geoff Duke on Vimeo.

More of the cycling model from geoff Duke on Vimeo.

 
Leave a comment

Posted by on July 23, 2013 in Uncategorized


Product testing at the Whittlesea challenge

Last Sunday saw me product testing at the Whittlesea leg of the CSV Challenge Series http://www.vic.cycling.org.au/default.asp?MenuID=Recreational/c20073/17268. The weather was average to say the least, and its funny that however many times you may have ridden over a course before, you tend to only remember the good days. Needless to say the bike did everything that was asked of it. I think the only thing really under test was me

A very wet start at the Whittlesea challenge

A very wet start at the Whittlesea challenge

Climbing Kinglake

Climbing Kinglake

Just short of Wandong, nearly home

Just short of Wandong, nearly home

 
Leave a comment

Posted by on June 6, 2013 in Uncategorized


Yet another disk conversion

Still beavering away in East Brunswick I have been working on yet another disk conversion for Riley at Lygon Cycles http://www.lygoncycles.com.au/. Every time I do one of these I start out assuming that I can use a standard disk tab. So far every time I have ended up making a new one. I can see why the most common place for mounting them is the outside of the seat stay and as far as I can see if a big manufacturer is not placing their tabs there they are using dropouts that are cranked upward and have a long section before meeting the stay. Anyway, what the cookie cutter bike makers do is not my concern. Riley wanted his disk caliper on the chain stay so I set about making a tab to match the angles ( and curves) of his frame. Results are below

Disc Tabs. Theirs and mine

Disc Tabs. Theirs and mine


Disc Tab before brazing

Disc Tab before brazing


Disk Tab after brazing

Disk Tab after brazing


During our initial conversation Riley had asked if I would put braze a d on the headtube. While I was flattered I don’t really want to lay claim to building a frame that I haven’t. Since Riley is a valued customer and since he will be getting this frame painted himself, I have devised a way to attach a headbadge that can be removed should the owner choose. I should really get some decals made up saying something to the effect of “modified by g.duke” and place them on the chainstay.
Removable headbadge

Removable headbadge

 
Leave a comment

Posted by on May 30, 2013 in Uncategorized


A Ridgid fork for a Seven

Just before Christmas I posted about building a rigid disc specific fork for a Seven mtb. https://gdukehandmadebicycles.com.au/2012/12/ This project has had more than one false start but after a couple of attempts and changes is finally finished. I don’t generally go for mismatched fork/frame combinations. I never really got the unicrown with lugged frame combination and don’t like the current wave of lugged crowns that you see on bikes that are tig welded together. While my preference is to build with lugs this has nothing to do with the method of construction,rather the aesthetic. I unashamedly like lugs. However ,the Seven in question is tig welded ,very nicely i might add. So I decided to build the fork in a fillet brazed fashion in order that it didn’t clash with the frame. The intention to set it up for light touring grew out of discussion, and was one of the reasons for delay. I took my inspiration for this build from a post I saw some years ago on Bob Browns web site http://bobbrowncycles.com/custom.htm. As you can see from the photos below this is a through tube construction that should never be at risk of failure and yet is hopefully at ease with the lugless look of the Seven

Fork components on the bench

Fork components on the bench


Crown support and race

Crown support and race


Before going into the jig

Before going into the jig


In the jig awaiting brazing

In the jig awaiting brazing

Finished and painted

Finished and painted


Just waiting for a headset

Just waiting for a headset


Fork and Seven frame

Fork and Seven frame


Look for assembled pictures soon

 
Leave a comment

Posted by on April 26, 2013 in Uncategorized


Gabe Bouris wants to go to Rio

I first met Gabe Bouris a couple of years ago. He is a former tri-athlete who had a stroke and was later diagnosed with MS. He wanted to get back on the bike and I did some work on a leg brace for him. Given his condition Gabe has limited movement on his left side and can’t afford to over-extend here. He realized

Pedal plates

Pedal plates

he needed an effectively shorter crank on that side. How much shorter was unclear. Working with Darryl Perkins they came up with an idea that would hopefully answer that question. Darryl designed a series of plates that can be bolted on to an existing crank (after drilling a hole).The original pedal hole is used as the starting point with a pedal axle stub drilled and counter bored to take a 6mm cap screw. Each plate has 3 options for pedal placement, positioned 15mm apart and each starting at a different distance from the original pedal hole. Gabe came to me to get them made up. Coincidentally the pedal offset brought about by attaching one of these to the outside of a crank works in his favor. Hopefully this will enable Gabe and Darryl to find the optimal position so that he can have a real tilt at making the team for Rio. Best of luck mate

 
Leave a comment

Posted by on February 22, 2013 in Uncategorized


There are paint jobs and paint jobs

Its February already and while I was away in Port Fairy,riding with the locals down there and swimming in the ocean I got a couple of very exited texts from Tim who had met with Kevin Wigham pf Paconi fame to sus out details for the repaint of a frame I built for him a few years ago. I came back from holidays and a week later was met by Tim with a look of excitement and a frame with one of the most incredible paint jobs I have seen. Tim wanted to invoke all the elements of a traditional frame in the paint job. Kevin did the spray job and Ken Dickie did the lining.I believe Ken was the man responsible for the paint jobs on many of Norm Bates bikes.There is a nice symmetry here because this frame was built using lugs that came from Bates shop in Coburg. I cant take any credit for what you see, and can only be flattered that Tim would go to these lengths on a frame I built. I know these photos wont do it justice but enjoy.

Tims frame from the side

Tims frame from the side

Tims frame front on

Tims frame front on

Seat stay caps

Seat stay caps

chain stay stars

chain stay stars

Brake bridge detail

Brake bridge detail

Minimal fork and stem painted to match

Minimal fork and stem painted to match

Rear of headtube

Rear of headtube


Time to build it up
Side view

Side view

DiPell bartape http://dipell.com/ to match the brooks saddle

DiPell bartape http://dipell.com/ to match the brooks saddle

 
Leave a comment

Posted by on February 15, 2013 in Uncategorized


Merry Christmas

To anyone following this blog I would like to wish you all a Very Happy Christmas.

 The last month has flown by, starting with the fantastic evening at Meet the Maker as part of the Australian Custom Bicycle Show. I got to catch up with Ewin Gellie and meet both Darrel McCulloch from Llewlyn and Keith Marshall from Kumo. Got to hear both Darrel and Daren Baum speak and had a great evening. Back in the workshop Tim has finaly decided what to do about his repaint and the bike came back to have a front deraileur mount brazed on before that. There is box of new bits to put on when it returns so look out for photos soon.Also this steel Seven MTB http://www.sevencycles.com/came in with a request to make it suitable for disk brakes and to build a rigid fork for it. After a couple of emails to Karl at Seven, who couldnt have been more helpful I believe I have arived at the right length to make it. Given there are no lugs on the frame I plan to build a segmented fork to match

Image

Again,pictures to follow after a much food is consumed over the next few days and a holiday with the family takes place.

Once again have a Very Happy Chritmas and stay safe out there

 
Leave a comment

Posted by on December 21, 2012 in Uncategorized


Not “JUST” anything

The last month has been filled with a number of small bike related jobs that are really more about getting around problems and helping people out of trouble. The last one involved crimping the chainstays on Gareths from http://www.essendoncyclery.com.au/ On One Pompino so that the set of Omnium cranks he had chosen would fit.

Chainstay crimp for Omnium cranks

Chainstay crimp for Omnium cranks


While these jobs don’t take long to do they invariably take a while to jig up for. Many people would have a tendency to say “it’s only a little job and it takes more of my time than it’s worth” or”its just a few dollars worth of work, I can’t be bothered”.
Way back when I was an apprentice toolmaker I worked at VDO instruments where we made car instruments for Ford ,Holden ,Toyota and others as well as a range of aftermarket gauges. VDO is a German based company and as many of you may have experienced the Germans have a very distinct idea of how things should be done. As each new model came along a new production line was assembled along with the required tooling. At some point I was asked to make 6 pointer lifters, a sort of reverse pliers in order that the production workers could recalibrate the instruments when they were a bit out. This tool was placed on the face of the dial and the slot you see in the picture under the pointer boss. The operator lifted the pointer off and repositioned it. I made them twice. My first efforts were nothing short of an abomination and when my boss walked over and dropped them in the bin I had the temerity that only a 17 year old could have and said “but its only a pointer lifter”. I have never forgotten his response and making them for a second time taught me a valuable lesson. So much so that when that production run finished and that lot of tooling was being thrown out to make way for the next model I salvaged one of my pointer lifters. I have kept it for over 20 years and It reminds me that no job is too small to care about.
Pointer Lifter

Pointer Lifter


I am off to the Meet the Maker seminar tonight as part of the Australian Custom Bicycle show. Should be good. I can always learn more

 
Leave a comment

Posted by on November 30, 2012 in Uncategorized


At the Hanover Eastlink Ride for Home

Last weekend along with thousands of others I rode the Hanover Eastlink Ride for Home. I rode the Team Time Trial with a bunch of mostly 40 something blokes calling themselves the Cotter Pin Relics (CPR) . They had ridden last year in a time of 2.14 and despite the downpour we clocked a time of 2.07 this year. All in all we had a great ride and despite the fact that I tend to prefer the hills I would recomend it along with supporting such a worthwile cause

Out of the starthouse at Hanover's Ride for Home

Out of the starthouse at Hanover’s Ride for Home

Accending out of the tunnel at Hanover's Ride for Home

Accending out of the tunnel at Hanover’s Ride for Home

 
Leave a comment

Posted by on November 26, 2012 in Uncategorized


Gareth’s small wheel disk conversion

Gareth at Essendon Cyclery http://www.essendoncyclery.com.au/ aquired a small wheel Mojo and as you do, decided it would go better or stop better in this case, with a set of disk brakes and of course a pair of very nice Chris King hubs. Gareth removed the original dropouts and suplied me with both the new dropouts and the disk tab to braze in. We put the dropouts in forward facing to reduce the risk of pulling the wheel out under braking.No problem there

Forward Facing dropouts

Forward Facing dropouts


In typical fashion though when it came to the disk tab, something wasnt quite right. Clearly tabs are designed with the idea that the edge of the dropout is in line wth the inside edge of the fork blade rather than it being centred in the blade like this one.I sent him off an email with these couple of pictures and a couple of options
Original disk tab

Original disk tab

Disk tab alignment on these forks

Disk tab alignment on these forks


We could either move it to the centre and put a couple of spacers between the tab and the caliper, OR I could make up a new tab with longer legs and a bend in it to place it in the same plane and do away with the spacers. Gareth went for that idea.A bit of bandsawing,drilling, bending and brazing later, everyone was happy.
New and bent disk Tab

New and bent disk Tab

Brazed up disk tab

Brazed up disk tab

Looking down the blade

Looking down the blade

With that Chris King hub and wheel inserted

With that Chris King hub and wheel inserted


Pictures of the complete bike to follow

 
Leave a comment

Posted by on October 26, 2012 in Uncategorized